Video Tutorial: Lift & Reveal Treat Box

This week’s Stampin’ Sunday video will show you how to make a fabulous little gift box, perfect for table favours, stocking stuffers, or even as an ornament on the tree. I learned this design from Julie DiMatteo.

If your device/browser doesn’t allow videos, click here to watch on my YouTube channel. Don’t forget to like and subscribe while you are there!

Here’s the template I mention in the video, which you can download and print to help you assemble your own treat box!

How do you use gift boxes for your holiday giving … and what do you like to put inside them? Comment below and let me know!

Happy Stampin’!

Product List

Thanks for reading today! If you enjoyed this post or found it useful, please consider sharing it! And be sure to join me on Facebook for daily content!

Video Tutorial: Halloween Treat Box

This week’s Stampin’ Sunday video will show you how to make a charming little treat holder for Halloween or any other occasion!

If your device/browser doesn’t allow videos, click here to watch on my YouTube channel. Don’t forget to like and subscribe while you are there!

Once you’ve made your own treat box, don’t forget to share a photo in the comments below! I love to see your creations!

Happy Stampin’!

Product List

Thanks for reading today! If you enjoyed this post or found it useful, please consider sharing it! And be sure to join me on Facebook for daily content!

Seashore Blog Hop: Happy New Year!

It’s the last blog hop of 2019! As another year draws to a close, I am so grateful for the customers, teammates, and class attendees who choose me to be their demonstrator. With your support, this year I got to:

What an amazing year it’s been – and I couldn’t have done it without YOU! Thank you for making me a part of your stampin’ life!

The theme for this month’s blog hop is New Year’s, and I’m sharing a project that was a big hit at my recent craft fairs. I CASE’d this project from Jeanette Cobb, a demonstrator in the US. It is so easy to make, and it’s a fantastic gift item – with a post-it notepad, a pencil, and a 2020 calendar, it’s so useful to have! Best of all, it folds up into a super portable – and, as Jeanette would say, ‘purse-worthy’ – package!

The thing that really makes this project pop is the finished edges on the DSP. This is achieved by scoring along the long side of your DSP so you can fold in those edges. This makes it so sturdy and attractive!

I buy my calendars from Tricia’s Custom Treasures, a crafty friend of mine who lives in Nanaimo but will mail anywhere in Canada. Her calendars have all the Canadian holidays marked on them, and she can even customize the font to match your business branding! I’m happy to support another small business with my crafting creations!

I think Jeanette used magnets for her closures – I experimented with both magnets and velcro dots, but ultimately found that the most elegant solution was also the simplest. I’ve attached the punched shape with dimensionals, and positioned it so I can slide the top flap behind the punched shape to keep it closed. Low-tech to the rescue! (And yes, I used some retired punches – but I’ve included some current ones in the product list below which would do just as well for this project!)

I hope you enjoyed my project! I’m sending warm wishes to all my readers, viewers, customers, and stampers for a wonderful holiday season and all the very best in 2020. Whatever your year may hold, I hope you’ll continue to make time to stamp, create, and connect with others!

Now don’t forget to click on the buttons below to continue on the blog hop, and enjoy all the other New Year’s projects! Click on “Previous” to visit Erica’s blog and “Next” to see what MiRan has created!

Happy Stampin’!


Product List

Please visit my 24/7 online store by clicking above, or contact me: lauralyzer@gmail.com.


Have you subscribed to my monthly newsletter? You’ll receive project tutorials and inspiration, as well as all workshop dates and special promotion news. Don’t miss out, sign up today!

Video Tutorial: Tea and Cookies Pouch

This week’s Stampin’ Sunday video will show you how to make a really quick and easy gift item to use for teacher thank yous, hostess gifts, and any other opportunity that pops up over the holidays.All you need is one piece of 6×6″ Designer Series Paper!

If your device/browser doesn’t allow videos, click here to watch on my YouTube channel. Don’t forget to like and subscribe while you are there!

Once you’ve made your own tea and cookies pouch, don’t forget to share a photo in the comments below! I love to see your creations!

Happy Stampin’!

Product List

Please visit my 24/7 online store by clicking above, or contact me: lauralyzer@gmail.com.


Have you subscribed to my monthly newsletter? You’ll receive project tutorials and inspiration, as well as all workshop dates and special promotion news. Don’t miss out, sign up today!

Upcoming Class: Christmas Mega-Class

On Saturday, November 16th I am offering a special full-day class so you can get a head start on your Christmas cards. You will get to create 12 cards (2 each of 6 designs) and enjoy a delicious hot lunch as well. I’ve rented a special venue for this event, so we have lots of room to spread out and craft together! I think it’s going to be a wonderful day, and of course there will be some fun surprises to enjoy as well.

The workshop cost is $59, but until October 20th I am offering an Early Bird discount price of $54. So don’t delay – you have only a few more days to get yourself that discount! Sign up today to secure your spot.

Here are some of the designs I’ve been working on for our class.

I hope you’ll be able to attend this wonderful class, which is sure to start your holiday season off right.

Happy Stampin’!

Product List

Please visit my 24/7 online store by clicking above, or contact me: lauralyzer@gmail.com.


Have you subscribed to my monthly newsletter? You’ll receive project tutorials and inspiration, as well as all workshop dates and special promotion news. Don’t miss out, sign up today!

Seashore Blog Hop: 3D Projects

Welcome back to another month of blog hopping with the Seashore Stampers! How appropriate that our theme this month is 3D projects. As you know, I’m teaching a class on 3D projects this very day! (Thank goodness for the wonders of technology, allowing me to schedule this post ahead of time!!)

I love making 3D projects and small gift items. I often give them to my workshop guests and hostesses, and they are great sellers at the seasonal craft fairs I do as well. As we head into the autumn and winter season, there are so many occasions for gift-giving: welcome back to school gifts for students and teachers, hostess gifts for when we attend parties, stocking stuffers, table favours, trick-or-treat goodies … the list goes on! Here’s the gift I made for today’s workshop attendees.

The bag is made with a single sheet of 6″x 12″ DSP. I’ve used the beautiful Mosaic Mood specialty paper. It’s hard to see from a photo, but this amazing paper has a raised texture to it, and shiny accents.

Along the short side of the paper, score at 4″, 5-3/4″, 9-3/4″and 11-1/2″. Rotate and score along the long side at 1-3/4″.

Cut each short score line up to the 1-3/4″ score line to create flaps as below. Assemble your bag by adding Tear and Tape as shown, then decorate as desired.

I learned how to make this project from Nancy Forsberg at Stampin’ BAE (BAE stands Before Anything Else – how clever is that?!) who used the beautiful Come Sail Away paper for her project.

To finish off the bags, I added a shape cut from the Stitched Labels dies, and a stamped image from the Memorable Mosaic stamp set. I filled the bags with all the items my attendees will need for their workshop this weekend, plus a few extra treats!

If you love making 3D gift items like this one, you might want to purchase my 3D Tutorial Package! You can purchase the written tutorials, complete with colour photos, for $12. Or, you can purchase the tutorial package plus supplies – meaning, a pack of Designer Series Paper of your choosing, and co-ordinating cardstock, all cut, scored, and prepared for you – for $30. Just email me to make arrangements! Here are the projects you’ll get to make:

I hope you enjoyed learning how to make this fun and simple gift bag! Thanks so much for reading. Now don’t forget to click on the buttons below to continue on the blog hop, and enjoy all the other 3D projects! Click on “Previous” to visit Erica’s blog and “Next” to see what MiRan has created! These ladies are super talented and creative so I know you will love their projects!

Happy Stampin’!


Product List


Please visit my 24/7 online store by clicking above, or contact me: lauralyzer@gmail.com.


Have you subscribed to my monthly newsletter? You’ll receive project tutorials and inspiration, as well as all workshop dates and special promotion news. Don’t miss out, sign up today!

Video Tutorial: A Simple Treat Box

Today for our Stampin’ Sunday video, we’re making a really simple gift box out of a single sheet of 6 x 6” DSP! The perfect size to fill with any kind of small treats – such as mini chocolate bars.

(Note: If you prefer written tutorials, click here! If you prefer video tutorials, read on!)

If your device/browser doesn’t allow videos, click here to watch on my YouTube channel. Don’t forget to like and subscribe while you are there!

Once you’ve made your own gift box, don’t forget to share a photo in the comments below! I love to see your creations!

Happy Stampin’!

Product List

Please visit my 24/7 online store by clicking above, or contact me: lauralyzer@gmail.com.


Have you subscribed to my monthly newsletter? You’ll receive project tutorials and inspiration, as well as all workshop dates and special promotion news. Don’t miss out, sign up today!

Upcoming Class: 3D Projects

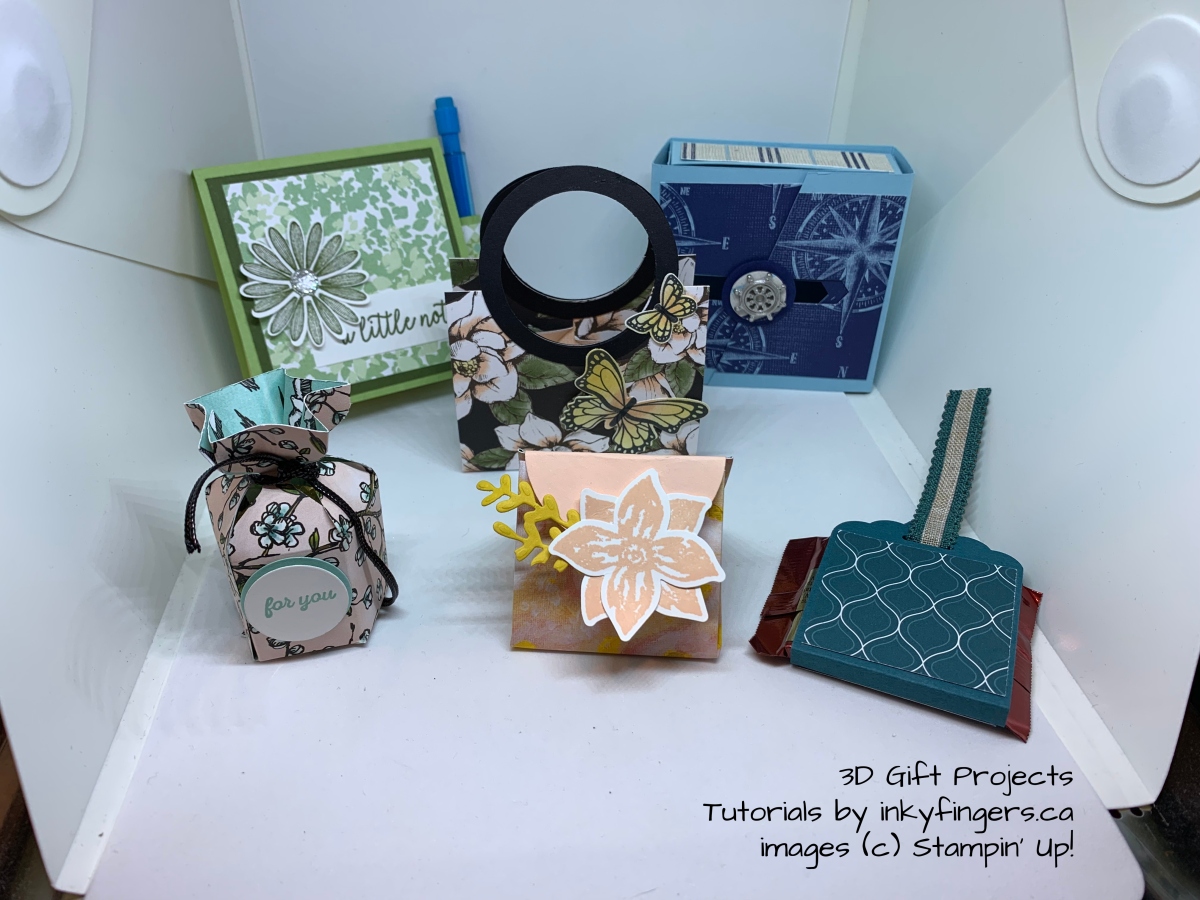
I love using Stampin’ Up! products to make and send cards to all my special friends and family, but there are so many other creative projects I can make as well! Using cardstock, ink, and paper to create beautiful 3D gift items is super fun, and terrifically useful as the holidays approach (hello stocking stuffers!).

On Saturday, August 24th I am offering a special class where we will create six small gift items. The $35 workshop fee includes a pack of 12 x 12” Designer Series Paper of your choice, which I will cut, score, and prepare for you so you are ready to create all these fabulous items at the class. You will also get to take home a full-colour tutorial package so you can recreate all these projects on your own! The registration deadline is Thursday, August 8th, so sign up today!

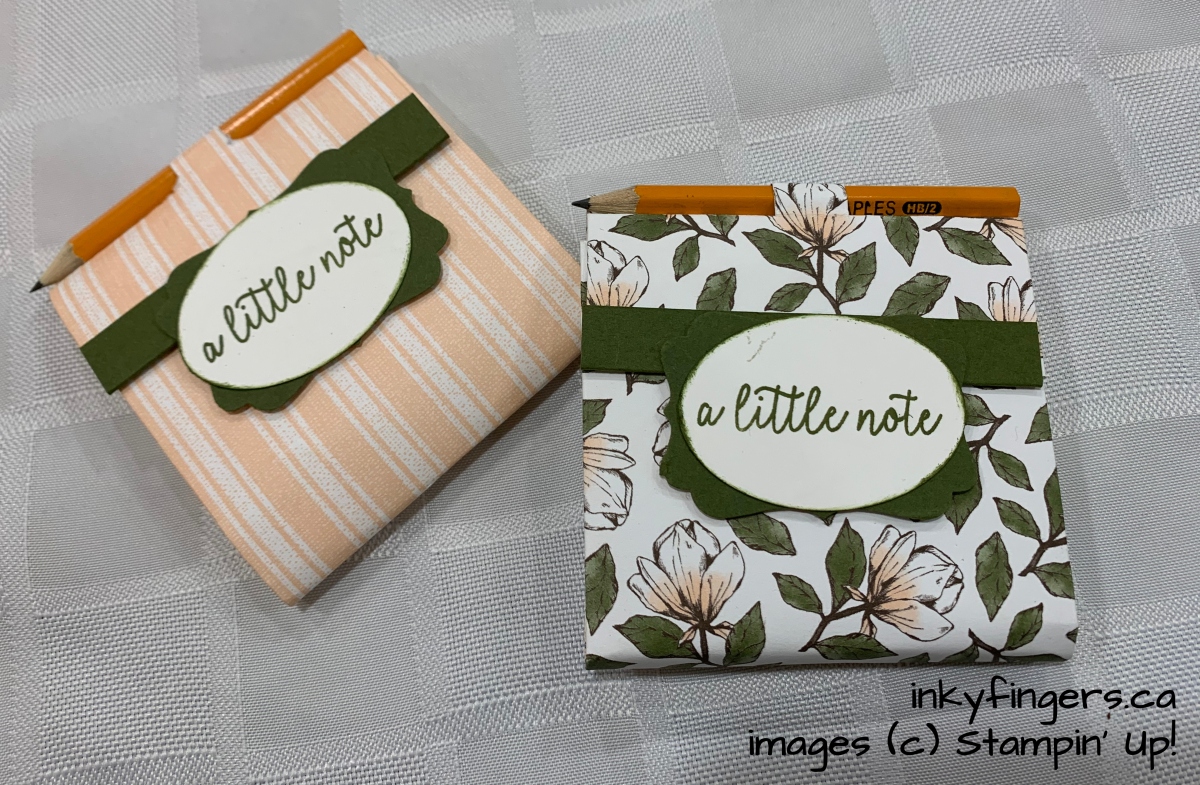
This post-it note holder is a great item to have on hand in your purse, your car, your backpack – always ready for you to jot down a quick note, shopping list, or phone number.

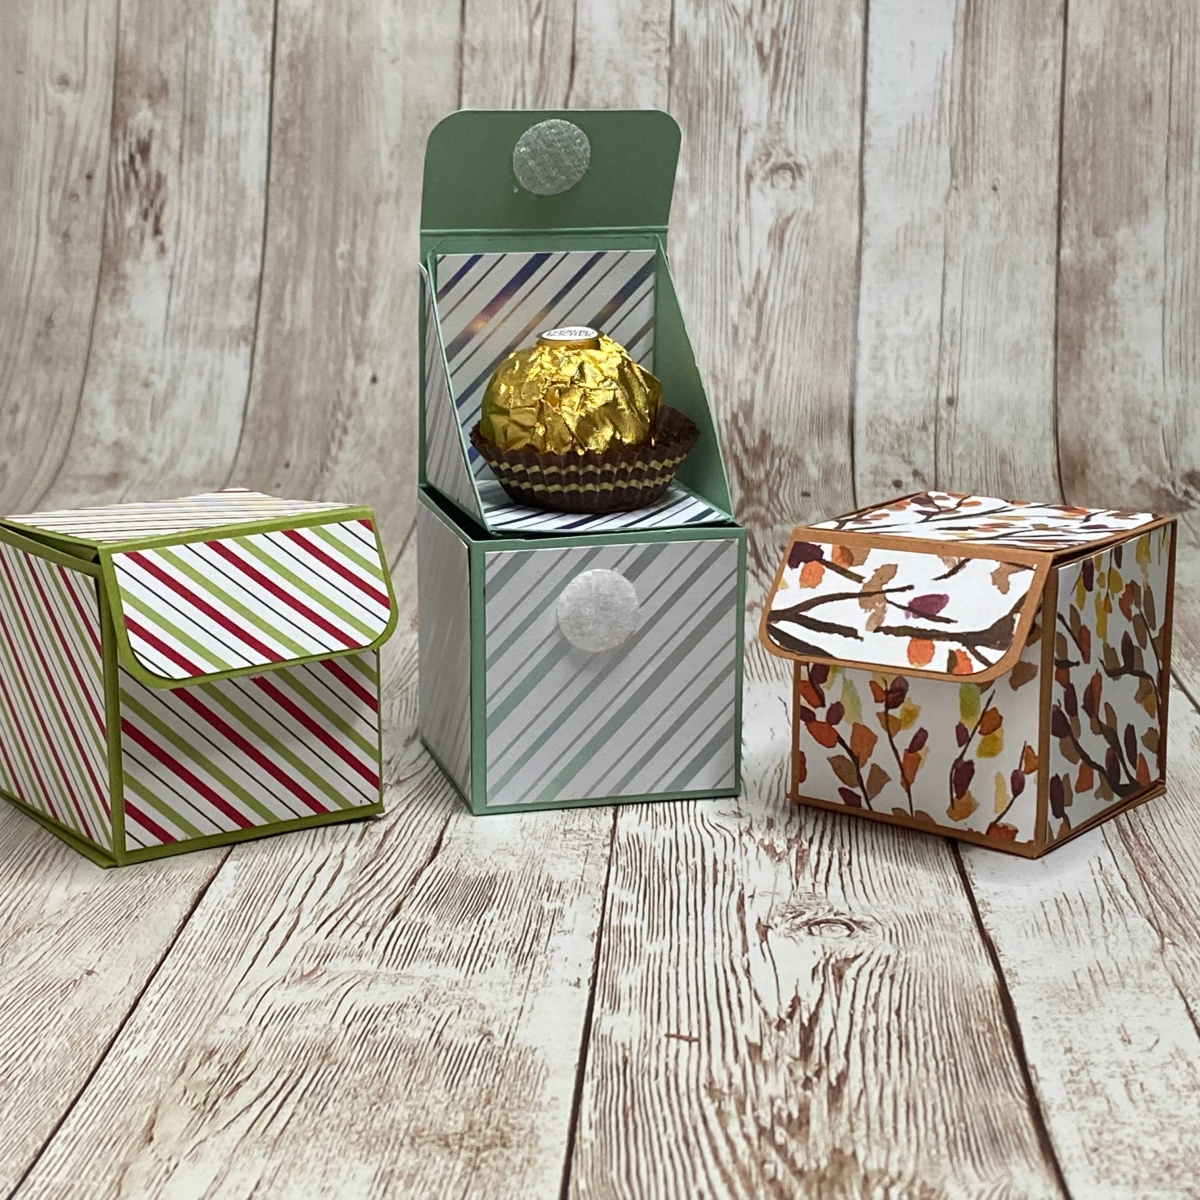
The self-closing box is a fun and creative way to package a small gift! The box and lid are attached, which makes the whole project quite sturdy.

I love this adorable little star-shaped treat holder, the perfect size for a Ferrero Rocher or other round chocolate!

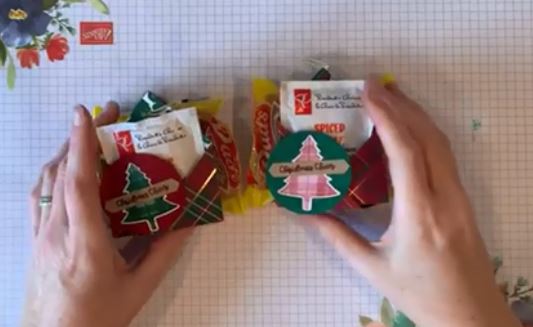
The DSP mini-purse is one I just had to create, as I find them so adorable and versatile. These could hold a whole cellophane bag full of goodies!

This triangle treat box is a really fun and simple design, with no cutting necessary. Perfect for chocolate nuggets or other small treats!

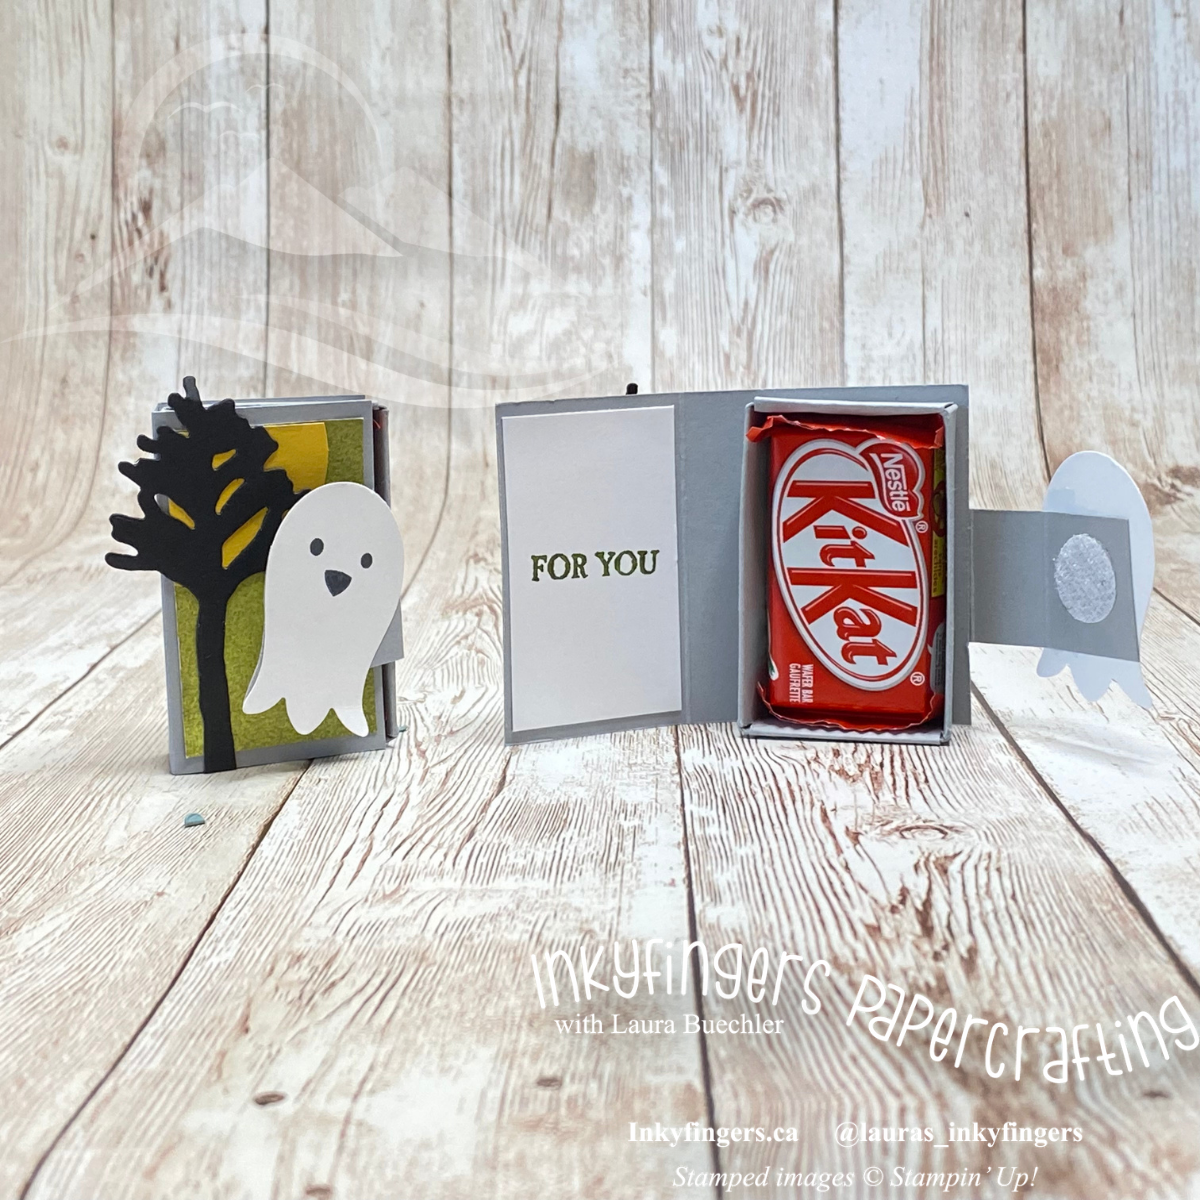
This square chocolate treat holder is one I often give to my workshop attendees or party guests, who have asked for it to be included in our workshop. It’s the perfect size to hold a Ghiradelli chocolate square!

These items are great for hostess gifts, table favours, stocking stuffers, teacher gifts, craft fairs, and more. I hope you’ll join me at the class – but if you can’t attend, don’t worry! You can purchase the written tutorials, complete with colour photos, for $12. Or, you can purchase the tutorial package plus supplies – meaning, a pack of Designer Series Paper of your choosing, and co-ordinating cardstock, all cut, scored, and prepared for you – for $30. Just email me to make arrangements!

Have you made any 3D gift items? Share them in the comments below! I love to see your creations!

Happy Stampin’!

Please visit my 24/7 online store by clicking above, or contact me: lauralyzer@gmail.com.


Have you subscribed to my monthly newsletter? You’ll receive project tutorials and inspiration, as well as all workshop dates and special promotion news. Don’t miss out, sign up today!

Video: Show and Tell – Make and Takes May 2019

Today’s video is a Show and Tell about all the beautiful Make and Take projects I got to make last weekend at a meeting of the Vancouver Island Stampin’ Up! Demonstrators.  All products available through my online store, though some products will not be available until June 4th with the release of the 2019 annual catalogue.

If your device/browser doesn’t allow videos, click here to watch on my YouTube channel. Don’t forget to like and subscribe while you are there!

Leave me a comment and let me know which of these projects you’re interested in learning! Maybe it will be featured in a future video!

Happy Stampin’!

Product List

Please visit my 24/7 online store by clicking above, or contact me: lauralyzer@gmail.com.


Have you subscribed to my monthly newsletter? You’ll receive project tutorials and inspiration, as well as all workshop dates and special promotion news. Don’t miss out, sign up today!

Butterfly Framed Project

Remember last week I promised to show you the amazing Make-and-Take project from the recent meeting I attended? Here it is!

This is such a gorgeous project, and yet really so simple to make. It starts with an 8 x 10” frame and a full sheet of Lemon Lime Twist cardstock as the backdrop. We used stamps from Tropical Chic, Touches of Texture, Petal Palette, and Timeless Textures, stamped in Lemon Lime Twist ink, to create some texture in the background. Really, you could use any stamps you have on hand for this step!

Then, we stamped on our four white squares (2.75”) using stamps from Playful Backgrounds and Beauty Abounds, in the four co-ordinating colours: Daffodil Delight, Balmy Blue, Grapefruit Grove, and Highland Heather.

These squares got layered with the Gingham Gala paper (3”) and a black cardstock square (3.25”).

I love the beautiful Butterfly Gala bundle, and I got to learn a new way of colouring the butterflies: with sponge daubers! Stamp the butterfly outline in Memento Black ink, then sponge on two co-ordinating ink colours to create an ombre effect. (NOTE: it has to be Memento black, or the ink will smear when you use the sponge daubers.) Okay, it looks pretty messy at this point …

… but look what happens after you punch it out!! Aren’t they gorgeous??

For the center piece, I got to learn another cool technique, using the stamp set All The Good Things. Did you know that you can use our markers (not Blends) to colour directly on red rubber stamps? That’s how I was able to create this image, with the tree trunk and pot coloured in Crumb Cake and the tree leaves coloured in Lemon Lime Twist (with some Old Olive texture added). The measurements for the white piece are 2-5/8 x 4”, and the black frame is 2-7/8 x 4.25”.

Now all that’s left is assembling!

I had a great time creating this project, and best of all, I got to learn some new techniques along the way. I love stepping outside of my usual “all cards all the time” comfort zone, so many thanks to Jennifer and Jean for organizing this fantastic make and take project!

If this project has inspired you, remember you can shop 24/7 at my online store. Keep in mind that some of the products are retiring and won’t be available for much longer! And if you’d like to come along with me to the next meeting of the Vancouver Island Stampin’ Up! demonstrators group, join my team!

Happy Stampin’!

Product List


Please visit my 24/7 online store by clicking above, or contact me: lauralyzer@gmail.com.


Have you subscribed to my monthly newsletter? You’ll receive project tutorials and inspiration, as well as all workshop dates and special promotion news. Don’t miss out, sign up today!